Paddle Dynos, Laches, and Other Monkey Business
Introduction
When it comes to complex and contemporary climbing movements, there is very little information available regarding the mechanics behind them, how to learn them, and what makes skilled climbers so good at them. Not only is this a major barrier for self-coached climbers trying to learn new skills, but this is also a large reason why many coaches and route setters — the ones responsible for creating the environments for climbers to learn climbing — often struggle with teaching and setting such movements.
As a coach and competitive climber myself, much of my free time is spent studying and trying to understand climbing movement on an explicit level. Because of the large need for publicly available information on this subject, I will be documenting some of my findings, thoughts, and personal experience regarding various movement concepts and climbing skills here on this website as an ongoing series. If this interests you, I encourage you to follow along.
“Absorb what is useful, reject what is useless, add what is specifically your own.” – Mao Tse-Tung
As a disclaimer, I am a climber, not a scientist. I am not claiming any of these concepts as my own novel ideas, and I will never claim that my explanations are 100% accurate or comprehensive. Rather, they are my best attempt to communicate my current personal understanding of complex concepts. Much of the terminology I use, if not adopted from another source, is likely my own derivation of other terms created for my own understanding. For any physics and biomechanics nerds reading this, I sincerely apologize for the scientific inaccuracies. I’m trying my best. My bad.
Paddle Dynos, Laches, and Other Monkey Business
Modern comp climbing, especially on the IFSC World Cup stage, has become known for its flashy, incredibly dynamic, gymnastic-like style. Whether you like it or not, performing at a top level in competition now requires becoming highly proficient in this type of movement. One of these movements is the paddle dyno. Here, a climber jumps to a handhold that is too poor to catch independently, so they instead swing or pull through to a target handhold in a continuous motion. A related movement is the lache, where the climber develops a large swing on a handhold before releasing at the end of the swing, experiencing an aerial phase before arriving at a target handhold/foothold.
Both of these movements involve a swing-like motion from handhold to handhold. Despite how unintuitive paddle dynos and laches can feel to many climbers (myself included), humans are literally built for them on an anatomical level. Before we dive deeper into these movements from a climbing perspective, let’s look at our cousin the monkey to fully understand how they work.
Continuous and Ricochetal Brachiation
The act of swinging by the arms from one hold to another is known as brachiation, and is a primary mode of transport in primates. Brachiation can be broken into two categories: continuous brachiation and ricochetal brachiation.
Continuous contact brachiation, like its name suggests, is characterized by continuous contact with handholds. Think monkey bars: at least one hand is in contact with a handhold at all times, with a given arm alternating between supporting the body (“support” phase) and moving through the air to reach the next hold (“swing” phase). Continuous brachiation is typically used for slower, “walking” speeds in primates.
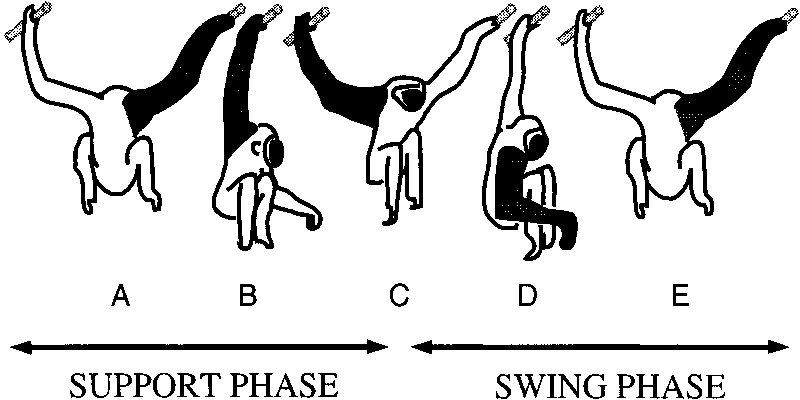
Richochetal brachiation, on the other hand, occurs when there is a brief aerial phase between the support and swing phase. The primate releases the support arm at just the right time, sending its center of mass (CoM) in an arcual trajectory through the air toward the next hold. Because of the aerial phase and consequent lack of stability and control in ricochetal brachiation, there are significantly more points for potential leakage of energy. Release the support arm too late or too early — for example — and energy is not conserved, reducing the swing and requiring additional muscular effort to continue brachiation. Richochetal brachiation is more often used for faster “running” speeds or when holds are spaced too far apart for continuous brachiation.
Reduction of Collisional Energy Loss
A pendulum oscillates with minimal loss of mechanical energy — so the swing phase of brachiation, being pendulum-like, is relatively efficient. The transition from a swing phase to a support phase, however, is not always as efficient.
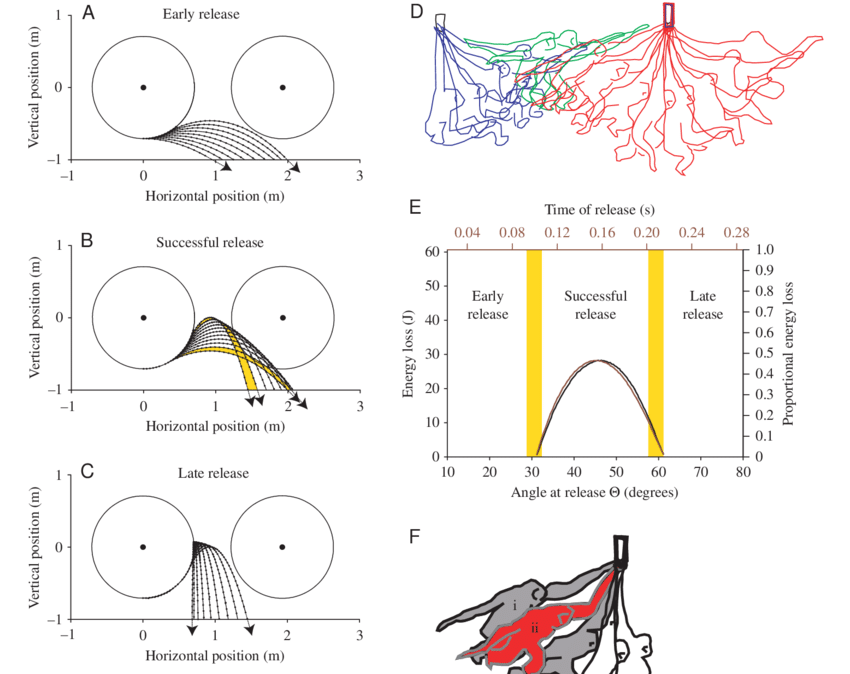
To better understand efficiency and conservation of energy in brachiation, let’s consider the moment of contact with the next hold after a swing phase to be a collision. It is at this moment of collision where — depending on the trajectory of the primate’s CoM, its velocity, and the positioning of its body — the kinetic energy from the swing will either dissipate throughout the hold and the body of the primate (reducing its swing), or it will be conserved and carry through to the next swing.
Because brachiation is a primary mode of transport for primates, they are extremely good at reducing energy losses during collisions. As mentioned before, in ricochetal brachiation, proper timing and release angle of the support arm is one of the most important factors. Too early of a release, and the primate undershoots the next hold and plummets to its death. Too late of a release, and the primate overshoots the smooth transition trajectory, requiring more energy dissipation and muscular effort to hold on and “reset” to the appropriate path into the swing phase. Although a slight overshoot is technically less efficient, it does create a safety margin, and some primates will even intentionally overshoot to prevent an early release. Release even later, though, and the primate doesn’t have enough horizontal velocity to carry it to the next hold, and it again plummets to its death. Poor monkey.
So when is the optimal release time/angle? We could look into physics equations to estimate this as accurately as possible, but we’re climbers; let’s keep this conceptual. Let’s assume that the monkey does indeed make it to the next hold. There are three requirements to eliminate collisional energy loss to allow for an efficient, continuous swing.
First, no energy is lost if the collision occurs at the instant that kinetic energy is zero (i.e. no velocity moving toward/away from the handhold at the instant of collision). Think back to the monkey bars. The best time to grab the next bar is at the peak of the swing when you feel weightless: after you stop swinging towards the next bar, but before you start to swing back.
The second requirement is for the path of the primate’s center of gravity approaching the new handhold to perfectly match the circular path about the hold. When an overenthusiastic child pumps their legs too hard and swings too high on a swingset, the chains become loose at the top of the swing, and the child will experience a frightening jolt of the chains tightening at the bottom of the swing as it corrects the path to the original circle around the bar. If the child had learned anything from their hours watching Curious George (or other more traditional monkeys), they would know that this jolt is the result of the changes in velocity and the less-than-optimal alignment of the first swing’s path forward going into the swing back. Hopefully the inevitable consequences of energy dissipation will teach them a lesson in overconfidence. In the primate’s case, however, it has already learned this lesson: it will alter its path by adjusting release angles and/or by bending its support arm, lifting its knees, or otherwise changing the shape of its body to change the location — and thus path — of its CoM.
Let’s assume that the primate is able to pull off the perfect swing, releasing the first hold such that its total kinetic energy equates to the rotational kinetic energy from motion about the second hold, and that the path of its CoM approaching the second hold perfectly matches the circular path about the hold. The third requirement to eliminate energy loss is the absence of torque applied to the new handhold in the opposite direction of travel. After all, how would the swing continue effortlessly if the primate puts in effort to stop the swing by deathgripping the hold?
In my time researching brachiation patterns of monkeys and comparing them to the incredibly impressive feats pulled off by modern comp climbers, these three methods of handling collisional energy loss are perhaps the most important concepts that I’ve come across in terms of helping my own understanding of paddle dynos, laches, and other swing-based movements in climbing. For the readers who have made it this far, let’s shift gears back to climbing and start to connect the dots.
Paddle Dyno Classification
When I tried my first paddle dyno, my understanding of the movement was quite limited. I very much viewed the paddle dyno as simply a massive dyno with some intermediate holds in a straight line for you to slap on your way past for an extra boost. I viewed it almost as the campus board: rapidly alternating hands to almost “sprint” up the wall with pure pull strength and little movement deviating from the straight path up the board. Sure, sometimes world cup climbers sometimes do this even in a more diagonal direction, but that’s just because of their unmatched power and their ability to pull through the holds SO INCREDIBLY fast that they can avoid the pull of gravity and maintain a perpendicular pull with each diagonally-facing hold.
What I failed to realize, however, is that most paddle dynos are far more complex than pure pulling strength. Even with something as simple as the campus board, there is a significant degree of weight transfer, movement in all three dimensions, and technique. Add in further dimensionality to the wall, varying directionality to the holds, a particular end position, and swap out the incut jugs for no-tex slopers, and the movement becomes infinitely more complex. How can you pull through and generate power in a straight line when the route doesn’t allow for it?
Needless to say, that first paddle dyno did not go well.
By no means am I a professional paddler at this point in my climbing career, but my current understanding of the move has definitely evolved since then. After much analysis and monkey research, I currently consider there to be two distinct types of paddle dynos: pendular and plumbline-avoidant. This classification is very similar to the ricochetal and continuous brachiation of primates.
Pendular Paddle Dynos
Pendular paddle dynos are most often congruent with ricochetal brachiation, with the climber being in contact with only a single hold at any given point. You may remember the term “plumbline” from physics class or if you’ve worked with a climbing coach. In this context, a plumbline is simply the vertical resting point underneath a handhold: if you were to jump up to a given hold and hang from it, the vertical line underneath the hold on which your body naturally settles is the plumbline. In a pendular paddle dyno, a climber makes contact with the hold with their CoM on one side of the plumbline. Their CoM naturally attempts to find the plumbline, following the circular path about the hold, ultimately passing the plumbline. After the climber completes a full swing and their CoM is now on the opposite side of the plumbline, they will release the hold, launching themselves toward the next. Pendular paddle dynos are, by nature, momentum-based and involve more actual swinging. Below is an example of a relatively straight-forward pendular paddle dyno I recently did at the Richmond Olympic Oval in BC.
To identify a pendular paddle dyno, one can look for an end position and/or a target foothold toward the far end of the swing. Unlike plumbline-avoidant paddle dynos, which we will discuss shortly, the climber’s start and end position involving the intermediate hold of a pendular paddle dyno tend to be mirror images of each other. Because of this, it is difficult for a pendular paddle dyno to contain more than one intermediate hold without a change in the direction of movement. Additionally, because the climber will complete a full swing, pendular paddle dynos require a somewhat downpulling hold — or at least one downpulling enough to allow for the climber to hold on throughout the entirety of the swing. In the example above, if you pause the video at the instant that I latch the intermediate hold and compare it to the instant that I release it, you will see that my hips (my CoM) are essentially reflected over the plumbline: the start and end positions are mirrored. The end position and target foothold is also toward the far end of the swing, and the intermediate hold is moderately downpulling.
Plumbline-Avoidant Paddle Dynos
While the pendular paddle dyno is more similar to ricochetal brachiation, the plumbline-avoidant paddle dyno can be viewed as more like continuous brachiation, with the climber most often being in contact with more than one handhold simultaneously. Plumbline-avoidant paddle dynos are characterized by the climber’s CoM staying on one side of the plumbline of each hold until in contact with the next. A bit more like the diagonal campus ladder that I imagined when trying my first paddle dyno, plumbline-avoidant paddle dynos require the climber to pull each hold quite quickly, before their CoM passes back over the plumbline. Although momentum and swing still play a large part in providing the climber time to utilize each hold, this type of paddle dyno is not inherently rooted in swing and momentum. Below is an example of this: a plumbline avoidant paddle dyno I did on Portland Rock Gym’s comp wall.
In the above video, the purpose of the large crescent-shape hold is only to redirect my momentum upward, allowing me more time to utilize the next hold. From here, I quickly pull through my swing arm (right) to the second hold before my CoM (hips) cross the plumbline of the first hold. As soon as my right hand makes contact with the next hold, that arm becomes the new support arm, and the plumbline of that hold is the new one my CoM must remain to the right of. I immediately engage this new support arm and my new swing arm (left) reaches for the final hold before my CoM crosses the plumbline of hold 2. Hold 3 is relatively juggy, allowing me to control the large swing I have developed from avoiding collisional energy loss.
Putting It All Together: Practical Tips for Reducing Collisional Energy Loss in Paddle Dynos
Earlier in this article, we went over three conditions to eliminate collisional energy loss for primates: absence of kinetic energy, alignment of paths, and absence of torque. However, we (unfortunately) aren’t monkeys. Brachiation is a bit different when instead of branches we have slopers on a wall designed to make us fall. Furthermore, sometimes our goal is to dissipate our energy to stop on a given hold or to reduce our swing. However, these three conditions always remain a part of our toolbox to control the energy that we create through swing. Now that we have a good understanding of the tools themselves, we can break down exactly how to use them in climbing.
If you’ve ever worked with a climbing coach or talked with competitive climbers who frequently dance on volumes, you may have heard of the concept of “making time over the feet.” As you’d imagine, this refers to maximizing the amount of time that your center of gravity is directly over your feet, typically while performing a complex dynamic foot sequence on slab. The benefit of this is that it allows you more time to perform such a sequence before your chest begins to fall away from the wall, you begin to barndoor, your foot slips and you donate part of your shin to the wall, or you arrive at the next hold with shoulder-tearing violence. It allows you time to get into the position necessary to execute a sequence. Fundamentally, however, making time over the feet is simply reducing the amount of kinetic energy you have by arriving at the foot with as little velocity as possible.
What many people fail to realize is that just like how you can make time over a foot, you can make time under a hand. Just like how making time over a foot gives you more time to execute a complex shuffle across a volume, making time under a hand gives you more time to execute a complex paddle across slopers. Arriving at a hold at that moment of weightlessness — that peak of your jump before gravity pulls you back down — gives you far more control over where a swing takes you. It prevents that violent jerk that stops you from being able to hold on to the handhold. And, most importantly, it allows you to better align your path with the circular path about the hold you’re paddling on.
Let me be clear, though: arriving at a hold with zero velocity to maximize your swing does not equate to arriving at a hold in the same position you’d have with the intent of catching and holding it. With paddle dynos, you must work backwards. Think about the end position: where your hands should be, where your hips should be (particularly in relation to the holds and their plumblines), and work back toward the start. For pendular paddle dynos, you can simply take the end position of the hips of each paddle and reflect it over the plumbline of the hold to find the start position of that paddle. For plumbline-avoidant paddle dynos, especially complex ones involving several intermediate holds, pay extra attention to the overall direction of movement and the direction that the holds are facing. This tells you which direction you want to be pulling, and thus where your hips should be in order to best utilize each hold. Your hands should be pulling as vertically as the holds will allow, and most of the lateral movement should ideally come from your CoM trying to find a naturally balanced position. Whichever side of the plumbline your CoM is on, you will naturally move in the opposite direction. Keep this in mind with each hold, and make sure each paddle facilitates the next. Therefore, rather than jumping into a naturally balanced position, jump knowing that your hips will naturally want to move in the direction of one, and utilize the energy from that fact to paddle your way to the top. Jump your hips into the start position for the swing, wherever that may be.
Until now, we’ve been thinking very two-dimensionally with paddle dynos: you can move up and down the wall, and you can move side-to-side. However, an extremely important factor in paddle dynos (and all of climbing), as well as a frequently overlooked one, is the ability to shift out from and in towards the wall. Paddle dynos are often extremely dimensional; they are set on large macros, volumes, and wall features. This means that you must navigate this three-dimensional space accordingly. If an end position of a pendular paddle is in close to the wall, for example, the start position is likely more out from the wall.
However, holds aren’t always set up perfectly for us. Especially with paddle dynos involving multiple intermediate holds, sometimes we have to make slight changes in the direction we are swinging/moving mid-paddle dyno — even if we’re doing everything right. That’s where the last piece to the puzzle comes in: torque. Torque, while subtle, is critical to the successful execution of a paddle dyno. It allows us to control the swing that we’re setting up. We’ve talked a lot about our movement and positioning in relation to the holds, but we also have to take into account our actual physical interactions with each hold and how we use each hold to control such movement and positioning. Take a look at the video below of this paddle dyno again at the Richmond Olympic Oval:
I struggled with this climb for much longer than I imagined I would, all because I didn’t know how to control my movement in and out from the wall mid-paddle. If you started farther out and jumped closer in toward the intermediate hold, by the end of the swing you swung back out and ended too far from the wall to compress and catch the target holds. But, if you started closer in towards the wall and jumped outwards, how are you supposed to catch the intermediate hold and change directions back inwards toward the target holds? The solution is somewhat intuitive: pull yourself back in towards the wall on the intermediate hold. In order to do this with this particular slopey hold, which I discovered after watching my friend complete the move with relative ease, you had to pinch it. This simple adjustment, using my thumb, allowed me to apply torque on the hold, changing the trajectory of the movement from moving out from the wall approaching the hold to moving in towards the wall. I’ve also noticed that because many paddle dynos use slopers — and because creating torque to pull yourself in towards the wall is difficult — engaging the thumb and pinching the hold is often beneficial.
The paddle dyno is undoubtedly a complex movement, one that doesn’t come intuitively to most climbers. Even at this point — after countless hours analyzing videos of paddle dynos, diving into the physics of brachiation, discussing with fellow comp climbers, and of course attempting to paddle myself — I still feel that I have so much more to learn. However, the concepts I’ve outlined in this article have been incredibly helpful for my own climbing, and I truly hope they will be for you as well. Below I have compiled a small collection of videos of paddle dynos that I’ve used for my own learning. I strongly suggest you take a look at these, as well as any videos you have of yourself, to help understand some of these ideas and begin applying them to your own climbing, coaching, and/or setting.